It’s easy to make this Queen Anne’s lace bracelet. It’s crochet with thread which keeps it delicate and it’s easy to make in multiple colors.
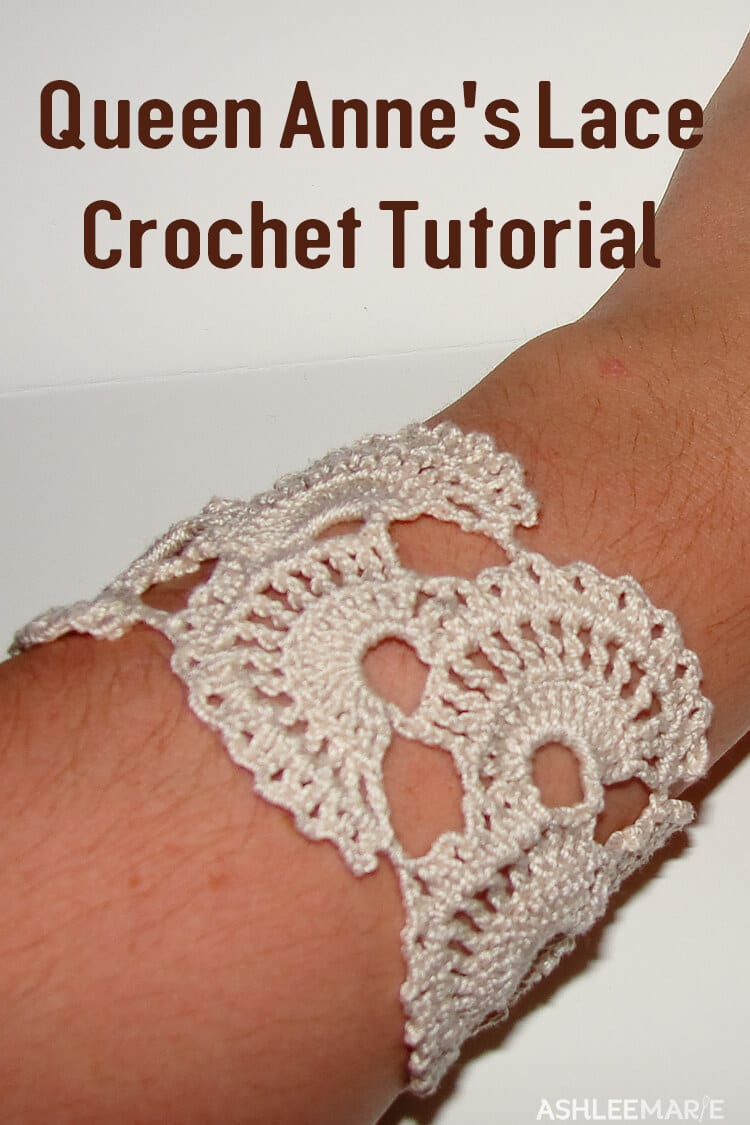
I’ve been seeing this queen anne’s lace pattern on all sorts of pieces lately, scarfs mostly, but also some bookmarks as well as a headband.
Then I saw this silver bracelet and fell in love! Since mine isn’t metal it’s not a cuff, as it wouldn’t hold it’s shape. So I made it a full circle!
It took a half dozen tries to figure out a pattern and size that would work. It was worth it!
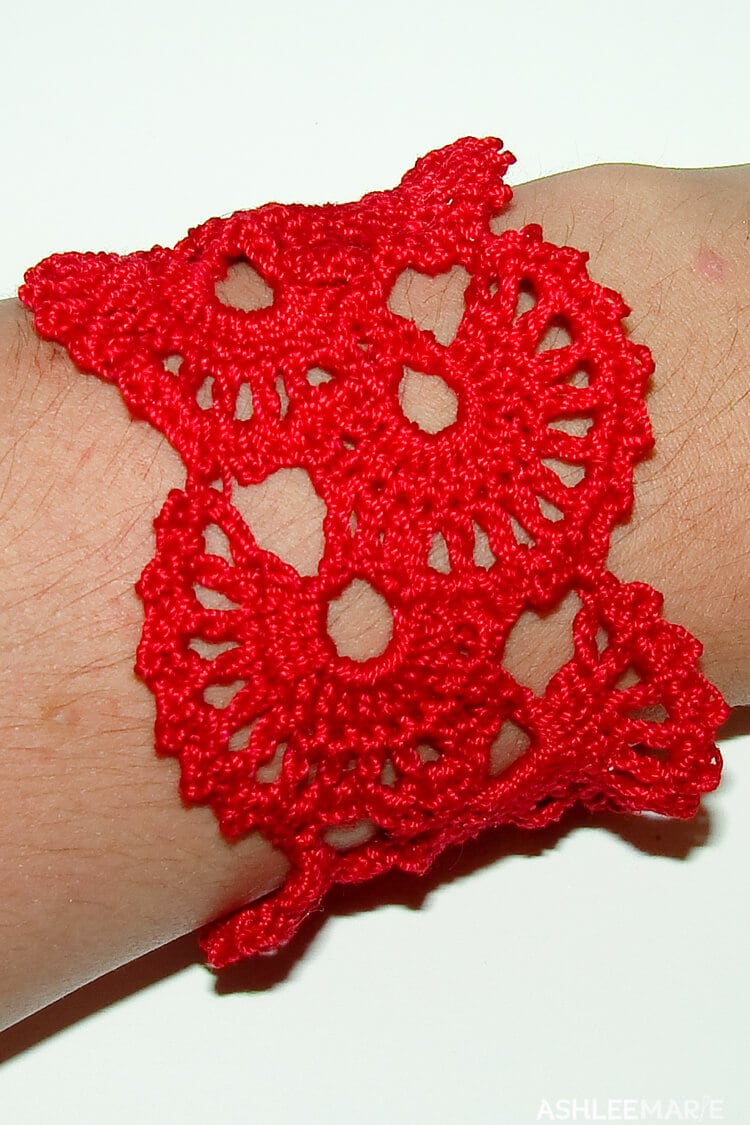
I’ve made it in 4 colors so far, and wear one of them all the time! I love them! Black, cream, red and now this brown one.
The pattern itself is pretty quick and easy, the last few rows, connecting the ends creating the circle is the tricky part, but I feel great about how I do it. I hope it’s easy for you to follow!
Buy the Ad-Free pattern pdf here!
Queen Anne’s Lace bracelet
Material:
crochet thread
hook 1.25
stitches used:
chain (ch)
slip stitch (sl st)
single crochet (sc)
double crochet (dc)
treble crochet (tr)
fan 1
ch 8, join with sl st to form a ring
row 1- working in the ring- *1sc ch3* (counts as first tr), 13 tr (14)
row 2- turn, work *1sc, ch3* in first tr (counts as first tr), *ch1, tr* in each tr around (14, with 13 ch1 spaces)
row 3- turn, work *1sc, ch2* in the first space (counts as first dc), *ch2, 1dc in same space, 1dc in next space* ten times. ch5, skip three spaces, 1dc in last tr (3rd chain)
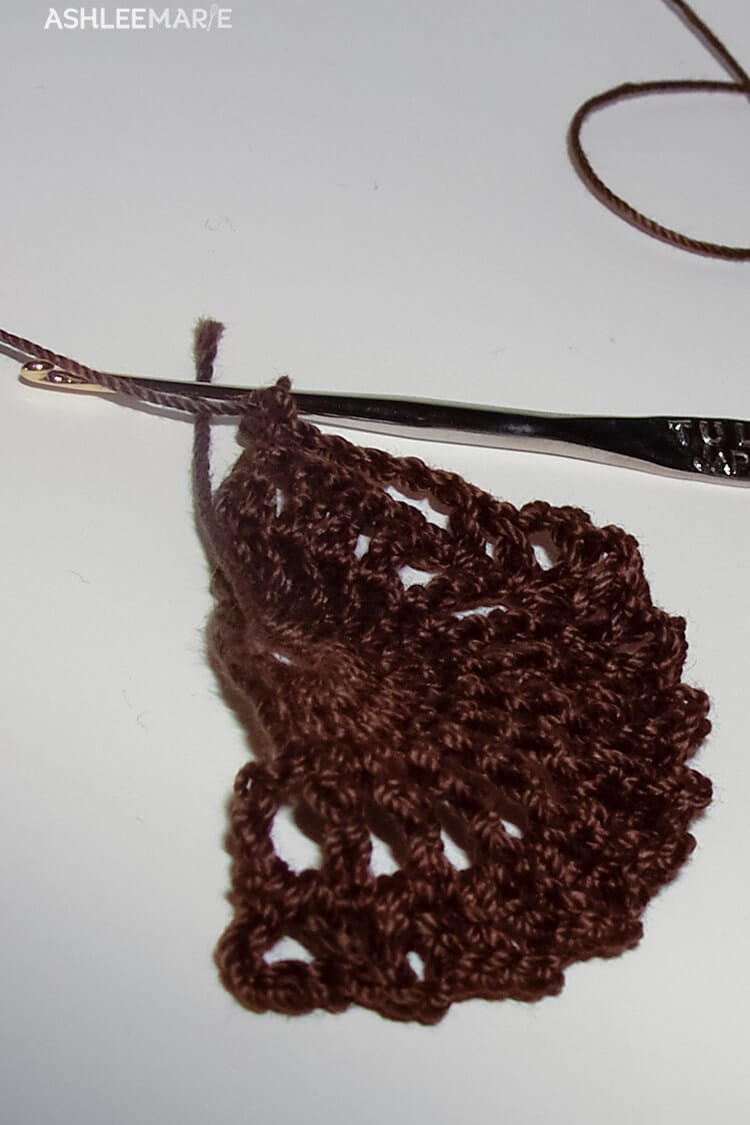
fan 2
row 4- turn, working in the ch5 space, *1sc ch3* (counts as first tr), 13 tr (14 total) then skip 1 picot of 3rd row and 1dc into next ch2 picot space
row 5- (same as row 2) turn, work *1sc, ch3* in first tr (counts as first tr), *ch1, tr* in each tr around (14, with 13 ch1 spaces)
row 6- (same as row 3) turn, work *1sc, ch2* in the first space (counts as first dc), *ch2, 1dc in same space, 1dc in next space* ten times. ch5, skip three spaces, 1dc in last tr (3rd chain)
fan 3
row 7- (same as row 4) turn, working in the ch5 space, *1sc ch3* (counts as first tr), 13 tr (14 total) then skip 1 picot (from row 6) and 1dc into next ch2 picot space
row 8- turn, work *1sc, ch3* in first tr (counts as first tr), *ch1, tr* in each tr around (14, with 13 ch1 spaces) skip next picot (from row 6) and 1 dc into next ch2 picot space (7 picot’s from the left)

row 9- (same as rows 3 and 6) turn, work *1sc, ch2* in the first space (counts as first dc), *ch2, 1dc in same space, 1dc in next space* ten times. ch5, skip three spaces, 1dc in last tr (3rd chain)
Repeat fan 3 (rows 7-9) until you have 8 fans (if for some reason this is too tight for you then add more fan’s here- but always in pairs, so add rows 10 and 11)
fan 9
row 25- (same as row 4) turn, working in the ch5 space, *1sc ch3* (counts as first tr), 13 tr (14 total) then skip 1 picot (from row 6) and 1dc into next ch2 picot space
row 26- (same as row 8 ) turn, work *1sc, ch3* in first tr (counts as first tr), *ch1, tr* in each tr around (14, with 13 ch1 spaces) skip next picot (from row 6) and 1 dc into next ch2 picot space (7 picot’s from the left)
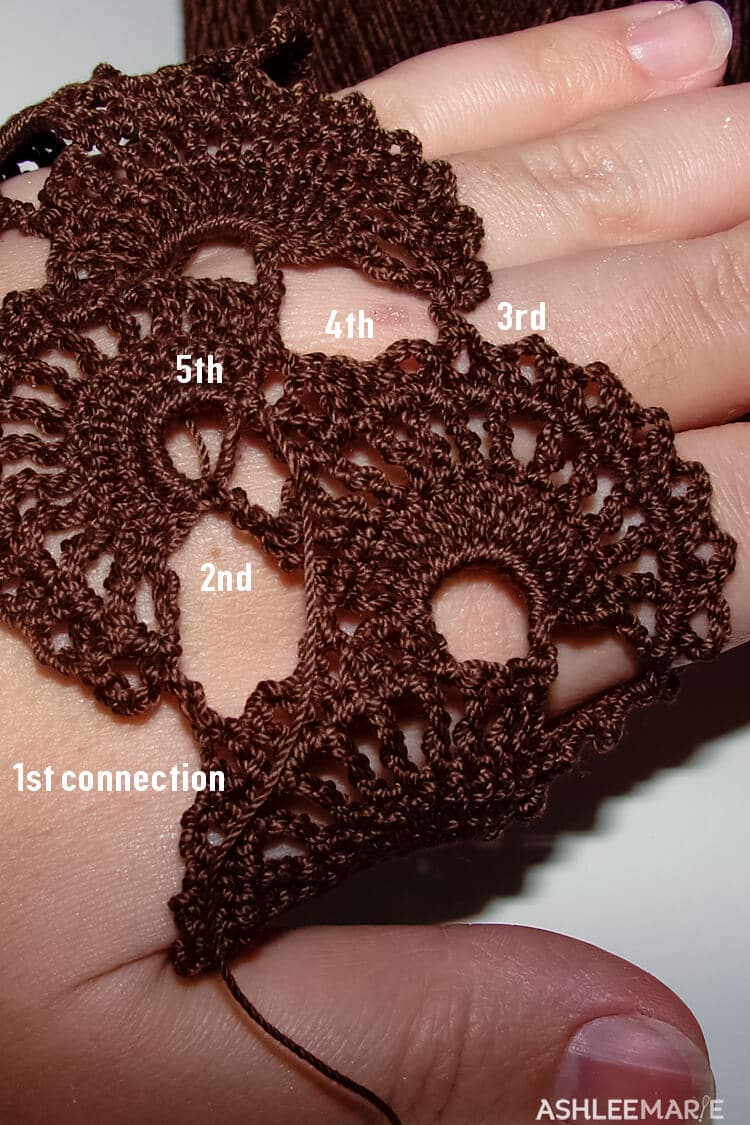
row 27- turn, work *1sc, ch2* in the first space (counts as first dc), *ch2, 1dc in same space, 1dc in next space* six times. ch1, dc in sc of row 3 from first shell (connecting it into a circle). ch1, dc in same ch space from row 26, dc in next space. *ch2, 1dc in same space, 1dc in next space* three times. ch5, skip three spaces, 1dc in last tr (3rd chain)
shell 10
row 28- (same as row 4) turn, working in the ch5 space, *1sc ch3* (counts as first tr), 13 tr (14 total) then skip 1 picot (from row 6) and 1dc into next ch2 picot space
row 29- turn, work *1sc, ch3* in first tr (counts as first tr). dc in the sc from row 1 in the first shell (connecting the circle a second time). *ch1, tr* in each tr around (14, with 13 ch1 spaces) skip next picot (from row 6) and 1 dc into next ch2 picot space (7 picot’s from the left)
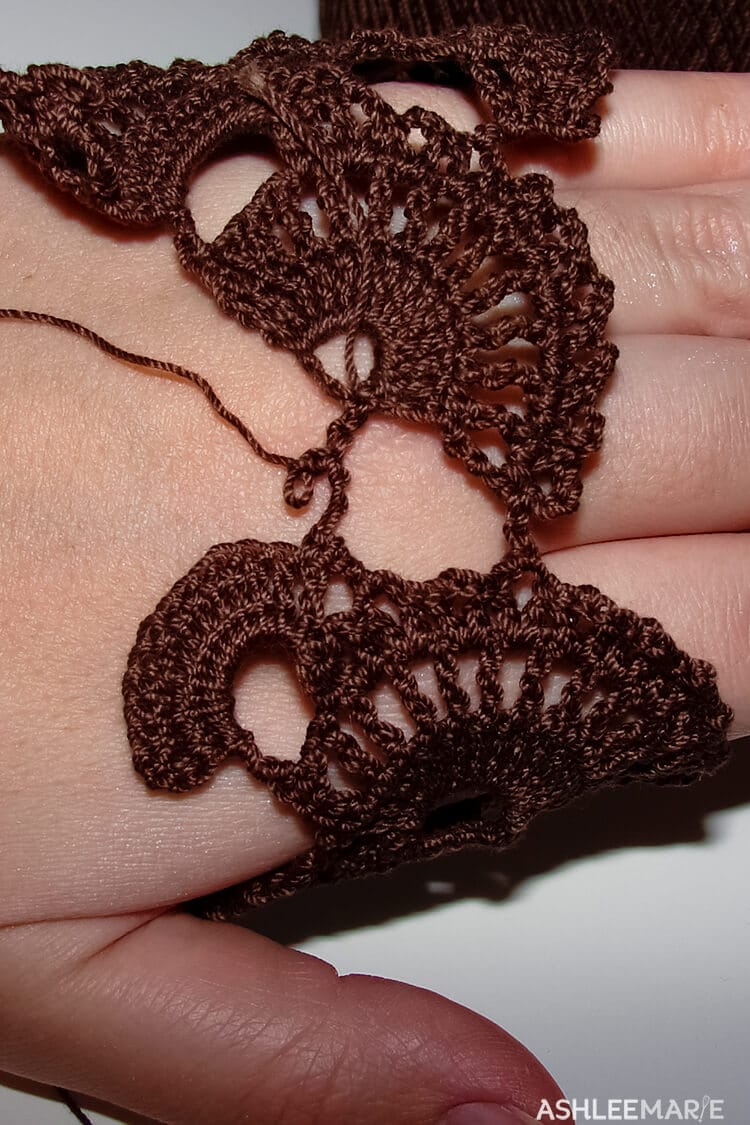
row 30- turn, work *1sc, ch2* in the first space (counts as first dc), *ch2, 1dc in same space, 1dc in next space* six times. ch1, dc in sc of row 6 from second shell (connecting the circle a third time). ch1, dc in same ch space from row 29, dc in next space. ch2, 1dc in same space, 1dc in next space. ch1, dc in sc of row 2 from first shell (connecting the circle a 4th time). ch1, dc in same ch space from row 29, dc in next space. ch2, 1dc in same space, 1dc in next space. sc in the bottom of the last tr in row 1 of the first circle (connecting the circle a fifth and FINAL time). finish off and weave in ends.
There it is!!! I hope you all love it as much as I do!!! I’ll be tickled if any of you try it! Don’t forget to link up your pinterest projects to our link party! Also Check out Holly’s shrinky dink bracelets, Amanda’s dog biscuits, and tomorrow is Rebecca’s turn!


Cherrie
I am having trouble with this bracelet. I get to row three and then I get lost. Are the *’s saying repeat? And do you crochet ten in the same spot? Could please give me a little more detail. I really love this bracelet! Thank you so much..
Ashlee
kay, lets see if I can help! this is kind of tricky, but with a little patience you’ll totally get it…
I use the 1sc, ch2 instead of ch3, I feel it’s sturdier, so I use the ** around it to kind of visually hold it together as a stitch.
Then the second set of ** is repeating! I guess I should choose something else to hold the first section together…
does that at ALL make any sense? in any way?
Ashlee
crap I forgot to answer your second question
the “*ch2, 1dc in same space, 1dc in next space* ten times” notice it says next space… it’s constantly moving over a stitch during the repeat!
f. aquino
love love love!!!
Ashlee
I’m glad you like it! I love mine still!
Nailya
Hi! I’m amazed at how you can make things from scratch, so to speak. I couldn’t find a nice pattern for Queen Anne’s lace anywhere else. This is a beautiful bracelet. I made one myself and a necklace too from your pattern. I also tried to create a diagram or chart and posted it to my blog here:
I hope you don’t mind!
I guess i used a thicker thread than the your pattern suggests because I only had to make 6 shells instead of 8 before finishing the bracelet. Or maybe my wrists are so thin (yeah, right, with all the pregnancy swelling going on!).
Ashlee
You did a great job! I’m glad you found my pattern and blog. And your necklace looks great! I’m glad you took the time to create a diagram, I’ve been meaning to, but just haven’t taken the time, I don’t mind at all! I use the crochet thread in the crochet isle, I think it’s weight 10?
Julia
Two questions:
-Would this be considered a very advanced pattern? I’m really, REALLY new to crocheting but I’d like to try this.
-Is there a video tutorial for this somewhere?
Ashlee
yes, an advanced patter, with q few tricky spots. But if you go slow and read carefully you might be able to do it. and no video, sorry.
Steph
Hi Ashlee, the bracelet is gorgeous, may I know the material of the thread?
Pure wool or something else? ‘Cause the silver one seems can “stand up” by itself.
I wonder if I use cotton lace thread, will it be too soft?
Thank you in advance.
Ashlee
I used cotton thread, the silver bracelet I BASED it on is SILVER, that’s why its standing on it’s own. It’s silver, the metal… The ones I made are cotton and totally flexible.
Julia
I’m having trouble with row three as well. I can’t get the loopy edges to form. I’m getting a straight edge with a V pattern inside. When it says ‘next space’, do I count the chain spaces, or only the tr spaces?
Thanks!
Ashlee
you should be working in the CH space, not in the tr stitches. let me know if that helps
Julia
Ohhhhh. Silly me! Thanks for the clarification! Haha this pattern was what inspired me to pick up crochet in the first place; now I’ve finally worked my way up to be able to crochet this!
Ashlee
I hope you like it as much as I do.
Erika
Hi im sorry to bother you. this is a very pretty pattern and i love it so im trying to do it myself but im stuck in row 8. I did connect the third fan to the second fan’s picot in row 7 but now that i have completed all of the trebels in row 8 im on the opposite side of where i connected to the picot in row 7 so i dont know how im supposed to connect it once again. help please and thank you.
Ashlee
that’s how rows work, then end on every other side 😉 connect row 8 to the first shell, skip next picot (from row 6) and 1 dc into next ch2 picot space
Stephanie
I had a blast trying this one out! I’m new to using crochet thread and it took me a long time to get the tension right so my stitches weren’t too loose! I ended up using size 10 thread with a 1.6mm needle, so my cuff was definitely too big!! I think that I would either need to cut out some of the fans or adjust the stitches to make it a little smaller. Of course, I belatedly realized that in the picot rows, I was adding extra ch 2s (so it went dc, ch2, dc, ch2, etc..) which actually gives it a little more of a ruffled look!
This was an absolutely beautiful pattern, even though it didn’t quite work out for me on my first try! I may go pick up a smaller needle and try again!
Thank you!
Ashlee
I love crocheting with thread! I’m glad you like it and let me know if try it again how it goes!
shalini
hi Ashlee,
that is a lovely pattern. i do have a doubt..row 8 the last DC is into the picot from row 3 is it ? i found if i had to crochet into picot from 6 the project folds over…
thank you so much for posting this
Ashlee
make sure your counting which picot to dc into, it’s how the work connects, if youdon’t connect to row 6your fan won’t work
delanoue
J adore vos bracelets je vais essaye
Ashlee
Thank you so much!
Lorna
Such a lovely pattern…i just finished mine and absolutely love it! Thanks so much, look forward to seeing more of your art 🙂
Ashlee
I’m so glad you like it! I really love this one, and made myself like 8 in all different colors!
Linda McTavish
Love Love Love this pattern. Have just finished my first one in a silver thread and it is beautiful. I live in the UK and as our crotchet terms are different had to change every stitch! Was not put off by this and glad I persevered. Thank you so much for your pattern. Linda from Scotland.
Ashlee
I’ve translated my fair share from UK to english, so I know how annoying it can be! I’m so glad you liked it!
Emily Youngker
Oh please help! I’m on shell 9 and I cannot understand how to connect it to the first shell. It says ” dc in sc of row 3 from first shell”. What sc?? If the picture is supposed to help, it’s not helping me!
Totally love this and would love to finish it!
Thanks!
Emily Youngker
I think I figured it out.
Ashlee
oh good! I’m so glad you figured it out!
Ashlee
connecting them is by far the trickiest part of the whole thing. try picturing it like your adding another shell again, picture the connection points of the other shells, that is where you’ll be connecting to the first 2 shells. Sorry I can’t be more help without seeing it. I tried my best to show it in pictures.
Erzsebet from Your Crochet World
I’m definitely going to make this crochet bracelet -shared on twitter as well 🙂
Ashlee
thank you so much for sharing! And I hope you enjoy making it!
Kay S.
I’m a little confused on row 3. I saw a previous question about this row, but it didn’t quite answer my question. When you move over a stitch, does that include the ch1 between the tr stitches of the previous row? Or do we skip the ch1 and just go to the top of the next tr stitch?
Ashlee
Row three doesn’t say “move over a stitch” that I can see (it’s been a long time since I made this so I’m hoping I’m understanding your question) it constantly says “space” which is that ch1 area between the tr’s. Does that help?
row 3- turn, work *1sc, ch2* in the first space (counts as first dc), *ch2, 1dc in same space, 1dc in next space* ten times. ch5, skip three spaces, 1dc in last tr (3rd chain)
Natasha
Hi, I think I made a wrong turn somewhere and I’ve ended up with a scalloped flower which ends on the opposite end. Do I end the pattern there and begin with a fresh chain loop on the other side as a connector? I’m afraid I haven’t explained this well enough.Any advice, please?
Ashlee
I’m sorry, I’m having a hard time understanding where you ended up, can you send me a picture and I can help better?
Sonja
This is a beautiful pattern! I want to crochet one long enough to make a cowl/necklace. I have one question though: is the pattern written with British or American crochet terminology? Thank you.
Ashlee
american
Vita
Dear Ashlee..
I just bought your pdf pattern, do you have the Stitch Chart picture of the pattern??
My English is limited and I cannot follow the instructions, i can only read a Crochet instruction in Stich Chart.
And thank you for the tutorial, this pattern is awesome.
Eta
Hello Ashlee,
Is it OK for you when I translate the pattern for this beautiful bracelet in Dutch and publish it at my blog?
Thank you so much!
Eta
Ashlee Marie
No it’s not