Remember my glass votive’s from last week? Well enough people asked how I did it so I made some more and took pictures of it so I could give you a tutorial!
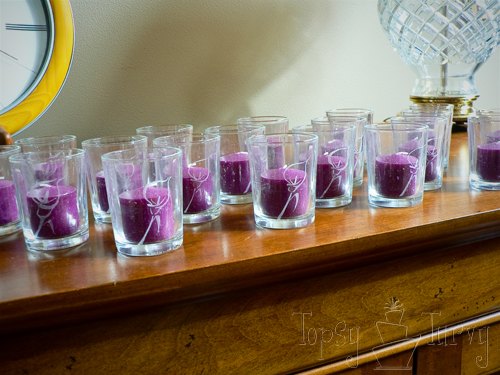
here is another picture from before, I made all these Calla Lily votive’s for a bridal shower I threw for my cousin 1 1/2 years ago. I used the same tutorial I’m about to show you. You can see that they are all very similar. Once you get started you can actually go pretty fast.
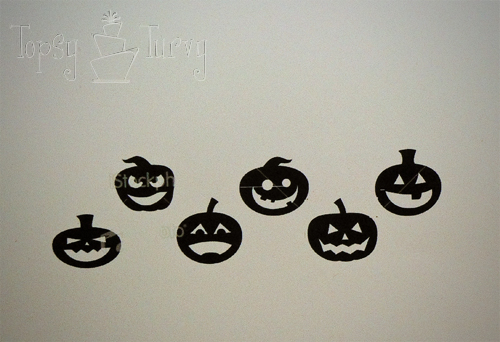
Okay, start with an image. Pick what you want to etch onto your votive and print it off. Mine measures about 5 inches by about 2 inches.
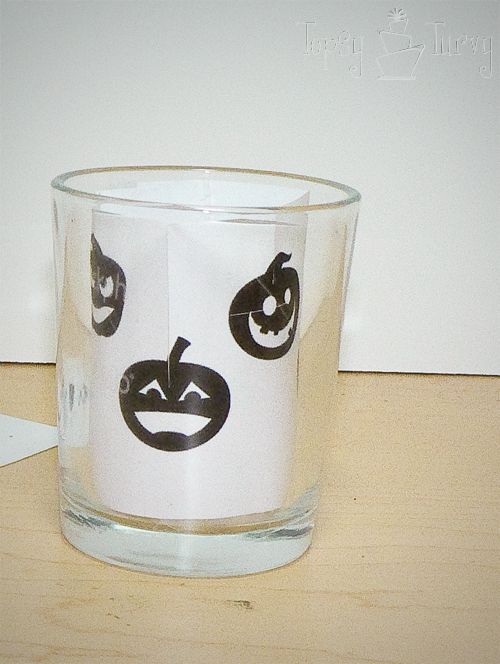
You want to cut it out and make a tube, put it inside the votive. now mine didn’t fit too good because the votive is angled. I actually ended up going back into Photoshop and angling my image (kind of like a cupcake wrapper) but I forgot to take another picture of it! That way it fit better into the votive.
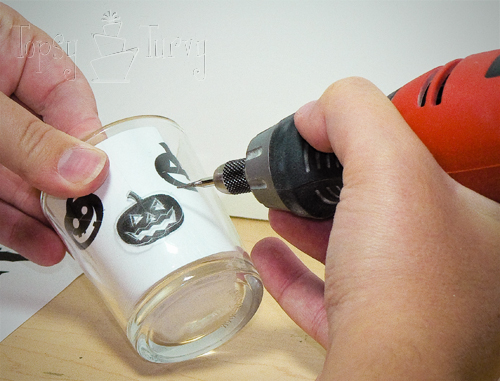
Next I took a diamond drill bit and outlined the pumpkin. It’s easier to fill it in if you don’t have to deal with the image distortion through the glass so I just outlined. But if your doing a smaller image that doesn’t need to be outlined, like the calla lilies, it sometimes helps to close one eye. It helps the distortion from the rounded glass that way.
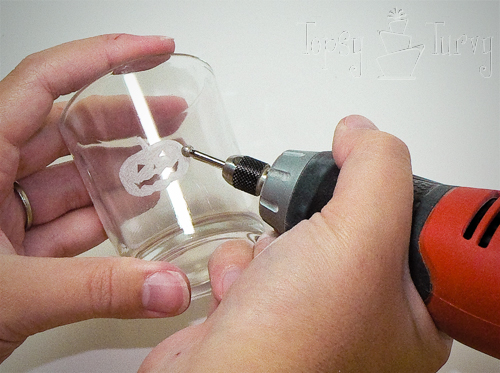
So once you take out the paper it leaves just the outline. Then I took out a larger diamond bit and filled in the pumpkin! It looks nice, huh? But it needs the rest of the pumpkins I think.
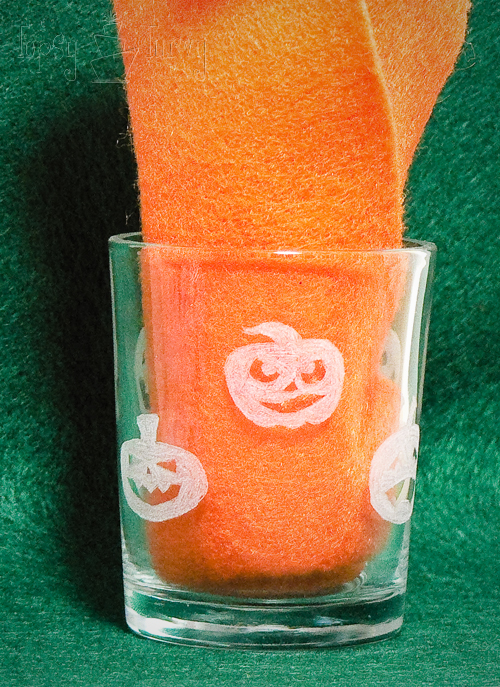
I put the paper back in, outlined ALL the rest of the pumpkins and filled them in. Isn’t it cute? Each head is different! I love how well it turned out. Each face is different too. It would also look good with just one head, larger, in the front.
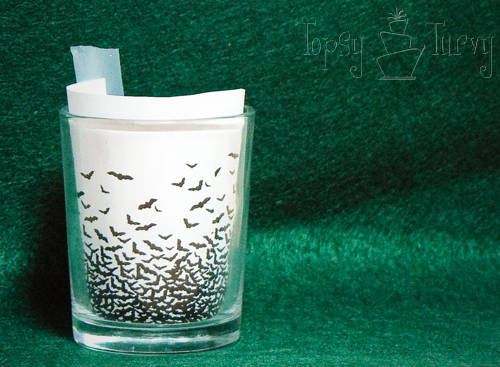
I was inspired by all the amazing bat crafts out there. So I decided to try my hand at bats. I picked this image and planned on doing the whole thing (notice how well the image fits into the votive? That’s the cupcake-ish shape I mentioned before).
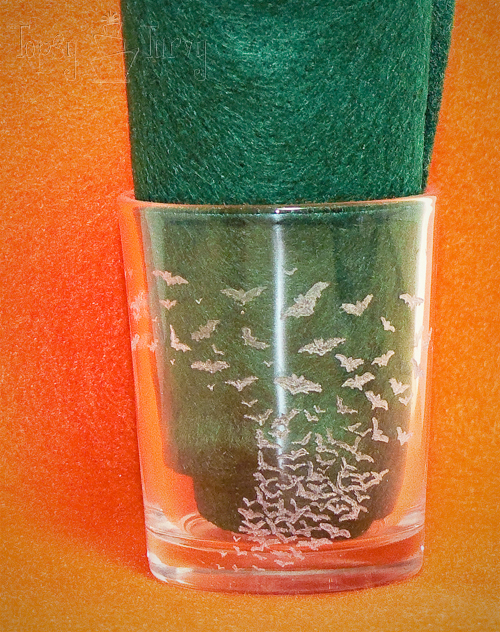
For this one I used the smaller diamond bit for the whole project. I ended up stopping before I did the image all the way around, I thought this actually looked really great in the end!


Courtney
The bat one is AMAZING! Wow! I am so impressed!
Ashlee
Thank you! I’m thinking I need a candy corn one now!
Allie
WOAH! you have a really steady hand! Those are AWESOME!!!! Wow!
Allie
Ashlee
Thanks! Luckily if you go outside the line it’s okay, just keep it smooth!
Michell
Perfect! Exactly what I’ve been looking for! Thanks
Ashlee
Great! I can’t wait to see what you do with it!
daffy
Love the idea,good work. Im going to try this…
Ashlee
It’s really fun. I think I’ll try to etch my drinking glasses next!
Birgit
How fun! I see some christmas etched glasses in my future!
Ashlee
Yipee! I can’t wait to see what you make!
Laurie
WOW! What a cool idea. I’m so glad you linked up to Tip Me Tuesday my readers are gong to LOVE it.
Thank for adding your button to the sidebar. {{high fives!}}
Ashlee
Thanks! It’s really fun to do and an easy way to personalize favors!
Stephanie Lynn
Ashlee, Who would have thought! Fantastic idea! Thanks so much for linking to the Sunday Showcase Party! I greatly appreciate it! I’ll be featuring this today – stop by and grab a feature button if you like. Hope you are enjoying your week! ~ Stephanie Lynn
Ashlee
Thanks Stephanie! I’m so glad you liked it! It’s been a really fun craft to do! I am trying to think of a fun Christmas one now!
Stephanie
Love this project! Thanks for sharing the tutorial, you make it look so easy! I can’t wait to try this.
Ashlee
It really is. It does take that first step of: BE BRAVE! But once you’ve marked up the glass just keep going until you like it~
Melissa
Wow! That is sooo cool! And I OWN a Dremel! Can’t wait to give this a try! The bats are super awesome.
Ashlee
YEAH for dremels! Mine’s actually a black and decker, but everyone knows what I mean when I say dremel!!! It is really fun to find new ways to play with my dremel!
Cheryl
These are so cool. Now I’ve just got to find the dremmel buried in the basement (and never taken out of the package). I’m featuring this at the next Craftastic Monday:)
Ashlee
Find it, find it, find it! I never would have boughten one for myself, my husband got it for Christmas a few years ago for me. I’m still learning all that I can do with it. But it’s fun!
Hilary @ KatrinkaJane
What kind of tool is this, specifically? Dremel makes different things… :/
Ashlee
oh gosh… I don’t know, it’s actually made by black and decker but everyone calls this type of machine a dremel so I do to! All the attachments I own are by dremel, but my husband heard the B&D had a better motor. Mmmm looking it up… It’s a hand held rotary tool! It has a ton of attachments and it’s small and easier to use in some cases than a full size drill! I use it all the time for tons of various stuff!
Jaime Trevino
What drill bit a you using.
Ashlee
this is the kit I used http://amzn.to/2k5bMLE
Mike
I recently got into using my dremel for glass etching and am having a hard time creating depth and contours in my lines. Do you have any advice?
Ashlee Marie
I don’t, I’m sorry